WPC decking can be installed almost similar to the natural wooden flooring or wall cladding. Based on the global practices for WPC deck installation, please find installation guidelines :
Plastics extrusion is a high-volume longitudinal product manufacturing process in which raw plastic is melted and formed into a continuous profile. Extrusion produces items such as pipe/tubing, weather stripping, fencing, deck railings, window frames, plastic films and sheeting, thermoplastic coatings, and wire insulation. This process starts by feeding plastic material (pellets, granules, flakes or powders) from a hopper into the barrel of the extruder. The material is gradually melted by the mechanical energy generated by turning screws and by heaters arranged along the barrel. The molten polymer is then forced into a die, which shapes the polymer into a pipe/profile/sheet that hardens during cooling at lower temperature. At final end, longitudinal shapes are trimmed and cut-to-length as per requirement.
- You need electric hand drill/power drill, cutter and a light hammer for installation.
- Accessories needed: Self-tapping screws, Clamps (Stainless or Plastic)
- The joist should be place on the rigid level ground first with a suggested space of 300-350 mm between two joists.
- Drill the hole from joist to the ground and fix a screw to the ground from the joist.
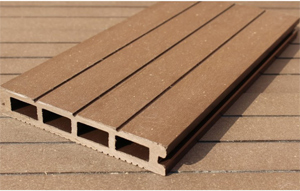
- Considering certain expansion coefficient of WPC material and expansion and contraction properties the maximal length of the decking should be kept around 3 Rmt.
- A gap of 2 mm is essential between two joists and 5 mm between two decking boards. This is a precautionary measure where temperature difference is huge from weather to weather.
- After fixing the joist to the ground, decking board is placed on the joist in crisscross manner or at right angle. Decking board is fixed with clamp and screw to the joist.
Click here to WPC Deckfloors Installation Guide